Lighthouse Point Bathymetry survey
On Aug 10, 2010 Paul Lamparelli and Paul Sears conducted a survey of water depths through the Lighthouse Point canal system.
We did the survey using two techniques at the same time:
- We manually recorded the depth sounder reading on a satellite photo of the LHP area.
- We used a computer to record the depth sounder readings along with GPS position.
Caution
We caution anyone looking at this data to not read a high level of precision into the data. Also, we are only amateurs so this could be completely wrong J
Observation notes
We set the sounder to read numbers below the transducer. We noted the actual depth near the transducer before and after the survey. We also noted the depths against Paul Sears' Tide board.
Tide gauge notes
The Sears' tide board is fixed on a piling near the sea wall. It reads in inches from 0 – 45". See the picture below. Some notes on the tide board calibration:
- It is not officially calibrated against any know tide datum (e.g. MLW). That said, I noted from an elevation view of a scale drawing of the sea wall that the top of the sea wall is about 4.5' (54") above MLW and about 3.5' above MHW.
- When it reads 17", almost all of the oysters on seawalls are covered (and we can get Aurora in and out without running hard aground, but with plowing a little silt – we can assume Aurora drew about 5' 10" at the time)
- When it reads 0", the tide is very, very low.
- The gauge does not go below 0" while the water might, so dead low, low tide is likely below the tide board 0" reading.
- The 0" line is 6" above the top of the seawall (for future calibrations); the distance from the actual water level to the moveable slider on the gauge is 65" (5'5")
- Putting all this together, and for what it's worth, the 0" reading on the gauge is 5" below the MLW level. This might make sense because 5" on the gauge is MLW and 17" is MHW. We have independently determined (se above) that we can get Aurora out when the tide gauge reads 17" so the numbers check out against each other!
Tide gauge picture (click to expand)

The bottom thick line is the 5" mark (the 0" fell off)
Observations from 10-Aug-12
- We started at about 1:15 PM
- The tide board read 5" (or from the gauge notes, MLW)
- The predicted tide at the start for Stuart was .35' (see http://tidesandcurrents.noaa.gov/noaatidepredictions/NOAATidesFacade.jsp?Stationid=8722357)
- For more tide datum notes see (http://en.wikipedia.org/wiki/Chart_datum)
- The depth offset between actual and depth sounder reading is 1' 9". That is you must ADD 1' 9" (or 1.8') to all the manual readings to get actual depth.
- We ended at about 2:40 PM;
- the predicted tide at Stuart was .54
- The tide board read 10"
- Thus the tide rose about 5" during the survey.
- The depth sounder would loose bottom when we got too close to shore and in very shallow areas. We attempted to manually account for the loss such as stop the boat and let the DS catch up.
- Out speed was about 1.9 kts as noted on the boat's GPS. We tried to note depths when the transducer was at the point of interest (e.g. a property middle), not the observers (who didn't have one beer during the whole ordeal!)
- The survey route was:
- From the Egret-Seahawk canal, to the Eagle Canal, the main entrance, down the main canal, then the Dyer-Seagull canal, the Seagull-Albatross, the Albatross-Seahawk, and back to Egret-Seahawk.
- A midpoint checkpoint is 2:14 at the entrance to Albatross-Seahawk.
From all this, it would seem that at least the early readings are w/r to MLW and the later readings are w/r to MLW + 5";.
The following are the carefully documented readings that Paul L. kept on our two hour tour.
REMEMBER: ADD 1' 9" (or 1.8') to all the manual readings in these pictures to get actual depth.
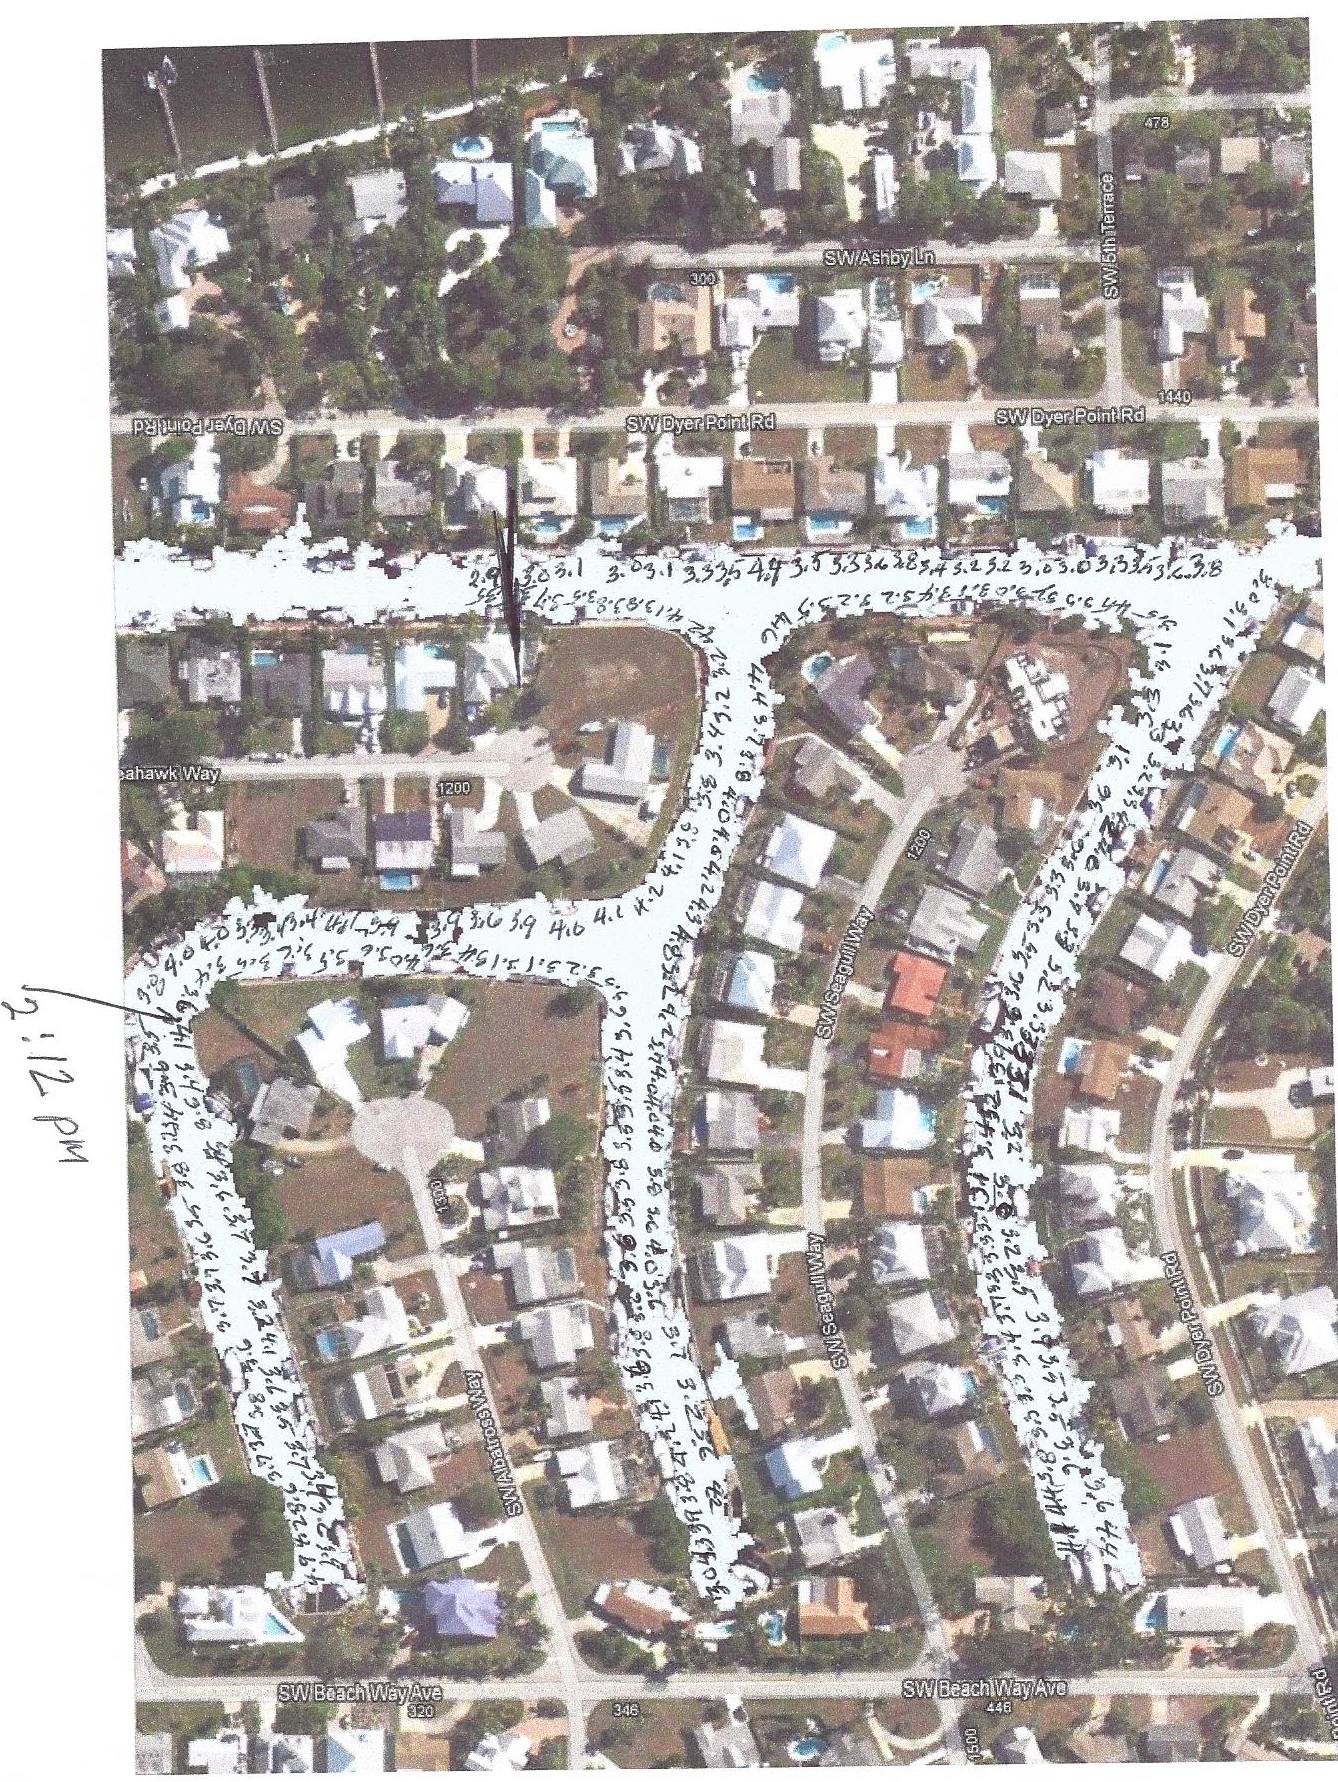 Dyer - Seagull - Albatross
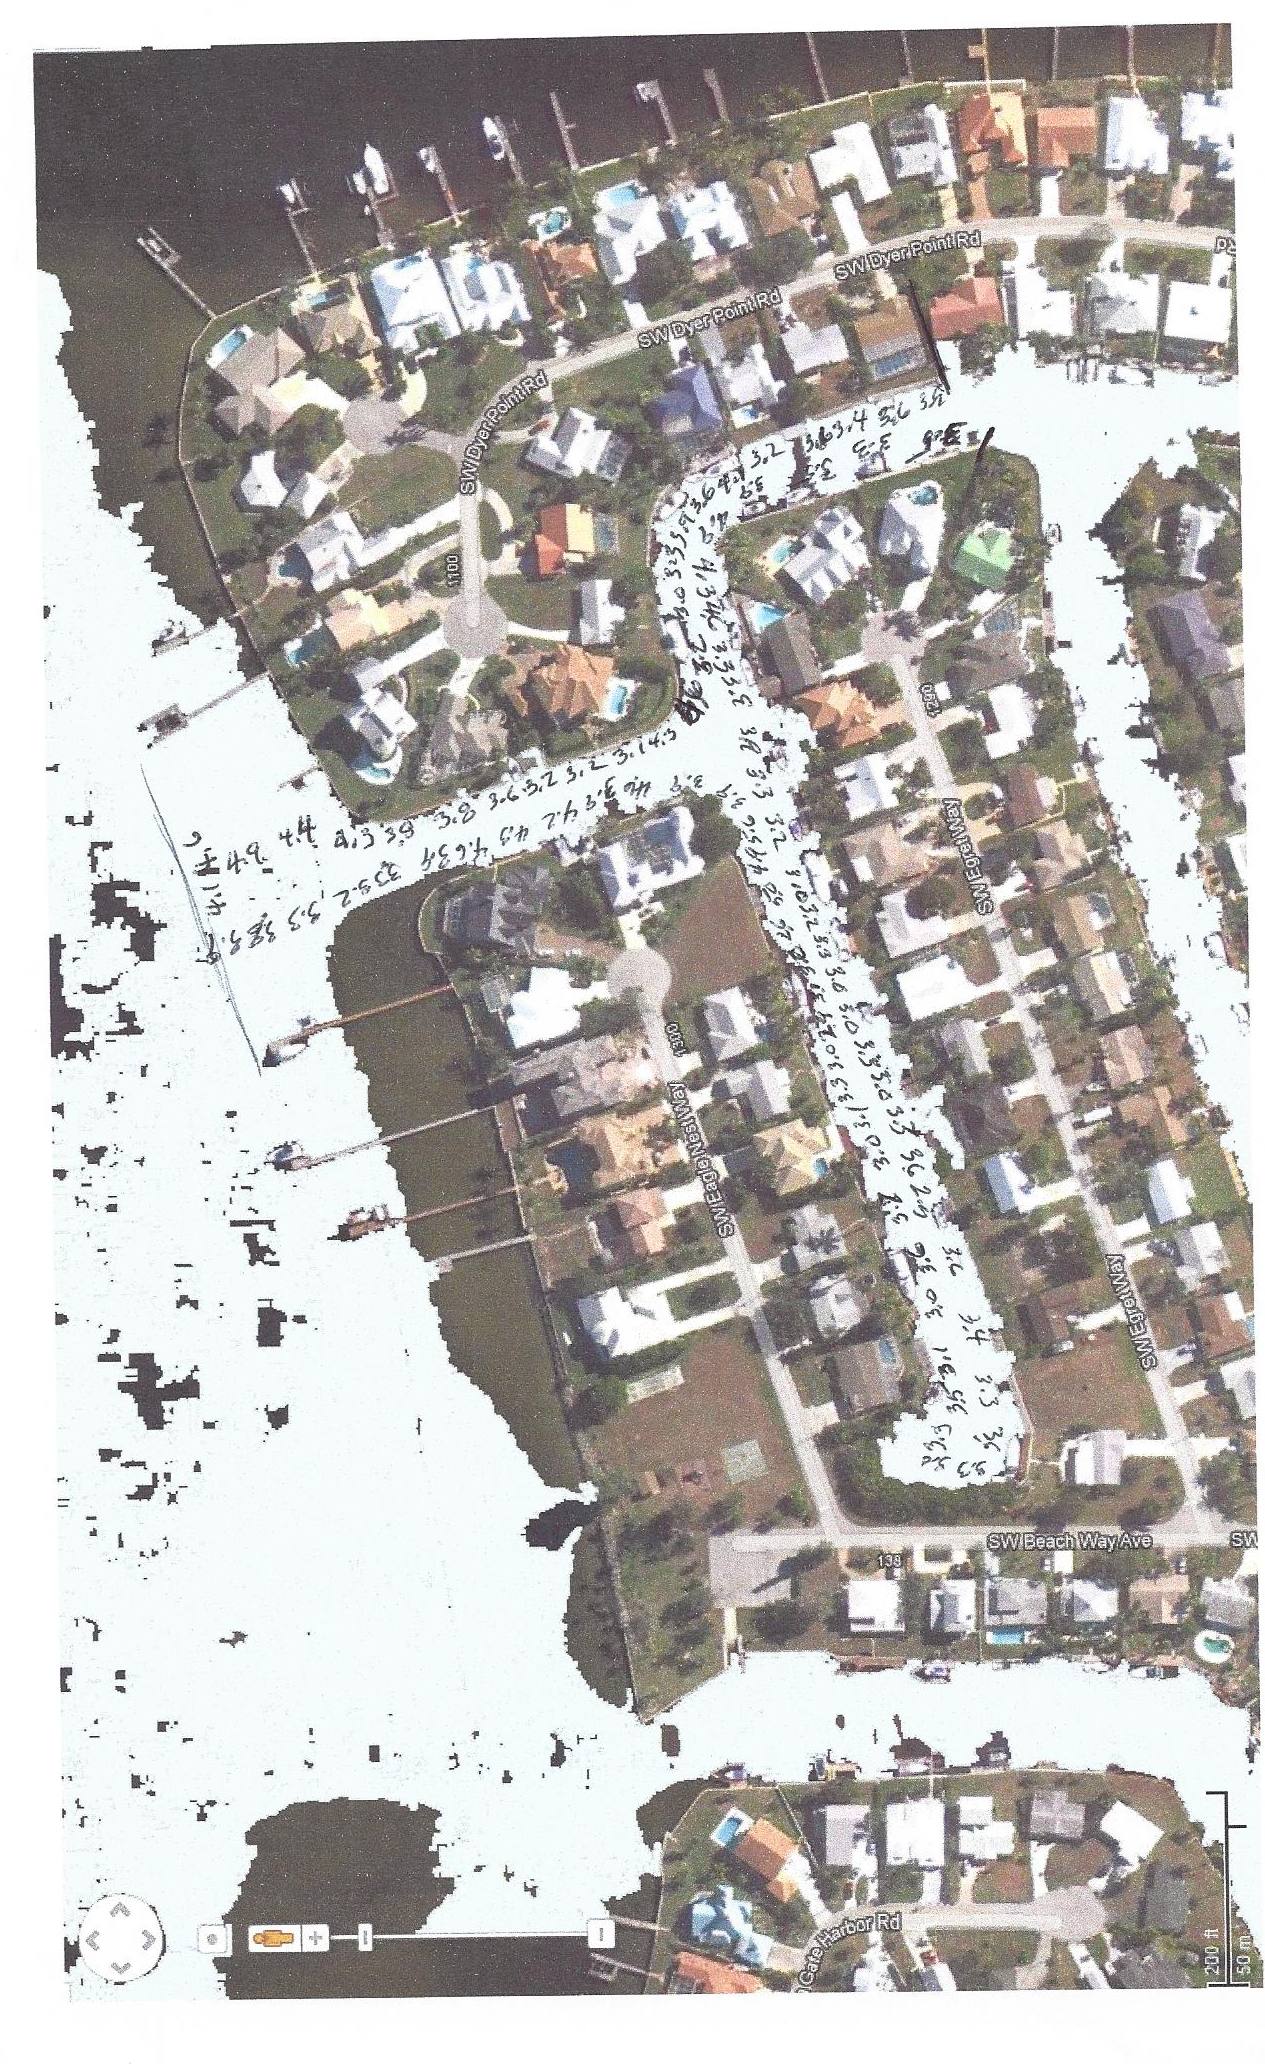 Entrance
to Eagle-Egret canal
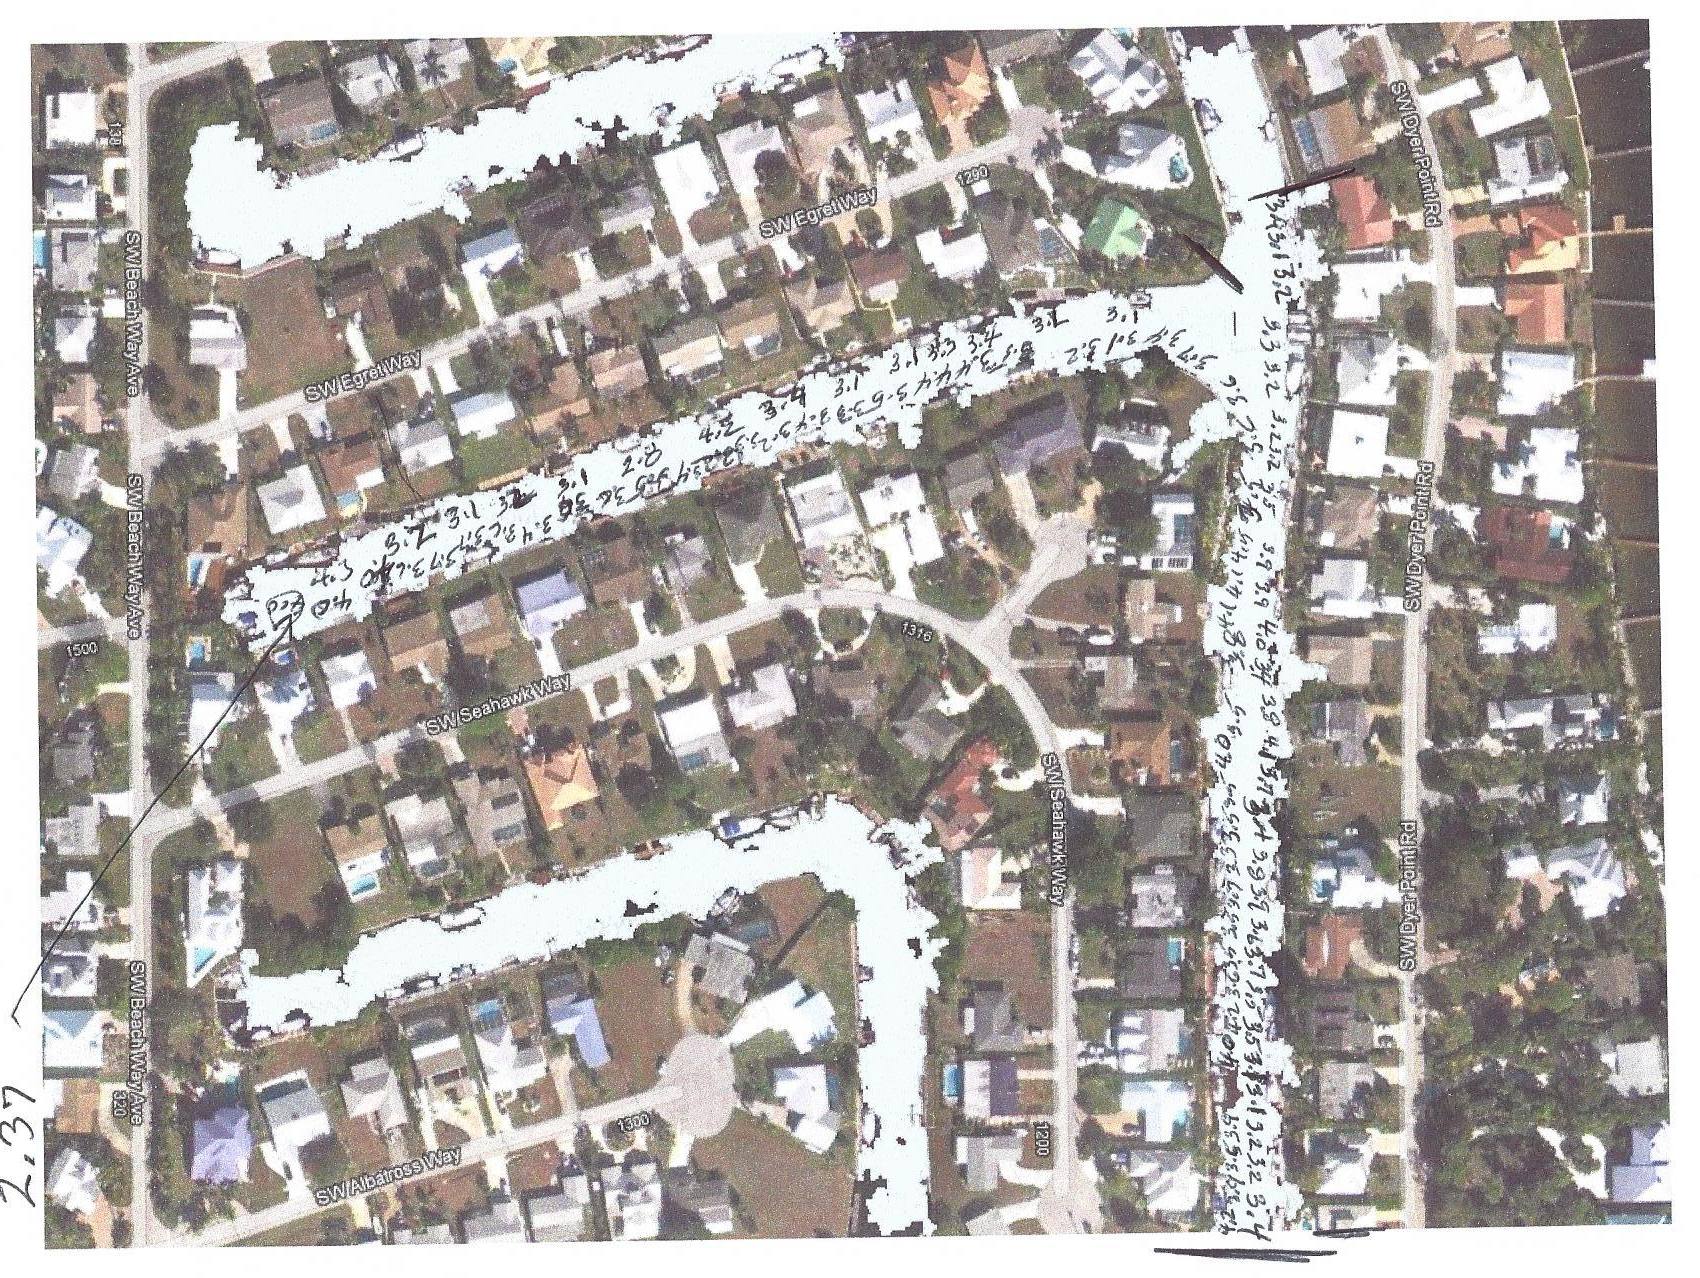 Seahawk - Egret
Electronic survey notes
We recorded depths every 2 sec along with the GPS position of a GPS sensor located directly over the depth sounder transducer. We hooked the depth sounder NMEA output to a laptop and connected a Bluetooth GPS such that the depth and position were recorded simultaneously. We used an application called “DrDepth" to merge and record these two data streams.
We also used DrDepth to create some images that are referenced below. More can be produced on request.
The first is a gradient image of the depth readings.
There is a ".KML"; file that should display the contour lines in Google Earth. This can be downloaded into a smart phone with GE installed.
Also you can display the gradient image in Google Earth by clicking here.
Accuracy note -- VIP
It is very tempting to take this electronic data as The Truth. Don't. As mentioned, the depth sounder would occasionally loose bottom and we don't know what it would output for depth nor what DrDepth would do about missing data. Also, there can be a delay of 2 to 4 sec between a new depth value and the next GPS position arriving at the PC.
In particular, we need to make another run with the computer and sounder down the middle of the canals because all we got were the sides of the middle.
The data from DrDepth is available to anyone who wants is. It can be exported into many formats, some of which will be made available on the Web shortly.
The transducer offset of 1.8' was added to the DrDepth data bringing it into agreement (more or less) with the manually observed data.
There appear to be some “holes" (and by that I mean 6-7') but these are probably depth sounder problems. Likewise, depths of 1' are wrong for areas we went over, otherwise we'd still be there.
Of note in the DrDepth images is the yellowish areas in the middle of the canals where there should be blues and greens (note the color legend at the bottom). These are at least the areas that need dredging.
What needs to be done next, possibly, is to take a spot survey at the problem areas and get some more accurate results.


